How to block an email address in Outlook: Step-by-step guide


Unwanted emails can quickly take over your inbox. Some are harmless but annoying, such as marketing messages and newsletters you no longer read. Others are more serious, including spam and phishing emails designed to steal personal information or trick you into downloading malware.
Fortunately, Microsoft Outlook includes several tools to help you manage unwanted email. You can block individual senders, block entire domains, create inbox rules, report phishing attempts, and control who can reach your inbox.
This guide covers how to block an email address in Outlook across every version: new Outlook and classic Outlook on Windows, Outlook on Mac, the web, and the mobile app. We also explain what happens when you block someone, how to unblock them, what to do when blocked emails sometimes still appear, and what else you can do to reduce spam and improve your email security.
What happens when you block someone in Outlook?
In Outlook, when you block a specific sender, Outlook doesn’t delete their emails. It quietly moves any future messages from that address to your Junk Email folder. They sit there until you manually delete them or Outlook clears them according to your account settings.
A few other things worth knowing:
- The sender is never notified: From their end, the email appears to have been delivered normally. They don’t know it isn’t reaching your inbox.
- It only affects future emails: Any messages already in your inbox before you blocked the sender stay there until you delete them yourself. If you want to remove all emails from a specific sender from your inbox, use the Sweep option.
- It’s address specific: Blocking john@company1.com doesn’t block jane@company1.com, even though they’re from the same organization.
- Work accounts may behave differently: If you're using Outlook through a work or school Microsoft 365 account, your organization's security policies may override certain personal blocking preferences. If unwanted emails continue to appear despite being blocked, contact your IT team for assistance.
Difference between blocking, ignoring, and unsubscribing
Outlook offers several ways to deal with unwanted emails. Each one is designed for a different situation.
| Option | Best for | What happens |
| Block | Spam, phishing emails, or unwanted senders | Routes all future emails from a specific address to your Junk folder |
| Ignore | Conversations and email chains you no longer want to follow (only works on email threads, not individual senders) | Moves the whole thread, and any future replies to it, to your Deleted Items folder |
| Unsubscribe | Newsletters and marketing emails | Sends a removal request to the sender’s mailing list |
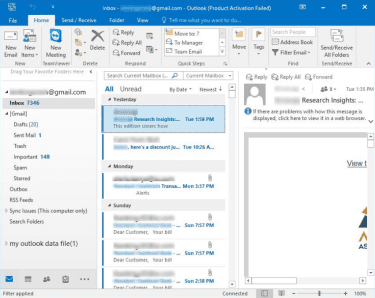
How to block an email address in Outlook on desktop
The steps for blocking a sender vary depending on which version of Outlook you're using and whether you're on Windows or Mac.
Which version of Outlook do you have?
Here’s how to confirm which version you’re running before you start:
- On Windows: Look for a gear icon (Settings) in the top-right corner of the app. If it's there, you're on new Outlook. If it's missing and you see a traditional ribbon toolbar with a File tab instead, you're on classic Outlook.
- On the web: If you're at outlook.com or accessing Outlook through a browser via Microsoft 365, you're using the web version.
On Mac, the steps are the same regardless of which version you have.
How to block a sender in the new Outlook for Windows
New Outlook is Microsoft’s redesigned app that’s replacing the classic desktop experience.
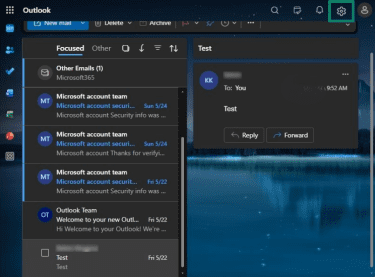
To block a sender directly from your inbox:
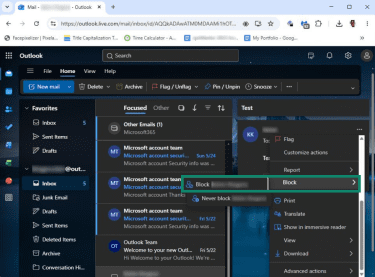
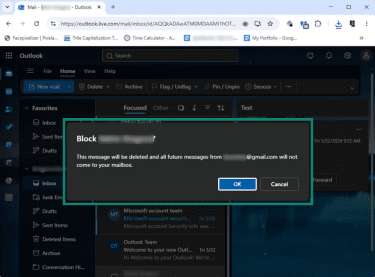
- Right-click an email from the sender you want to block. Select Block from the drop-down menu, then choose Block sender.

- Click OK to confirm.
Block a sender through settings (useful if you want to block an address before receiving any emails from it):
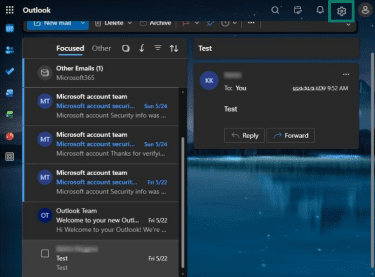
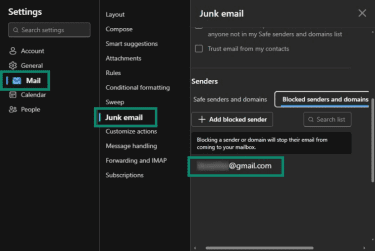
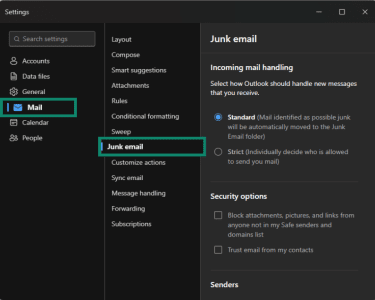
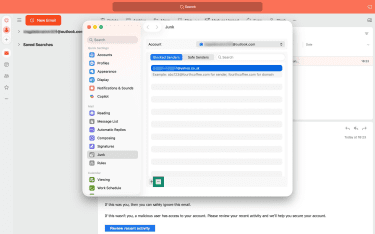
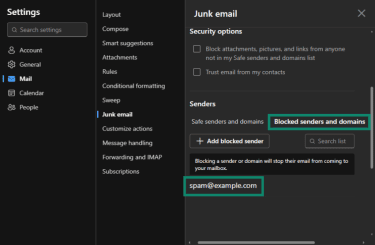
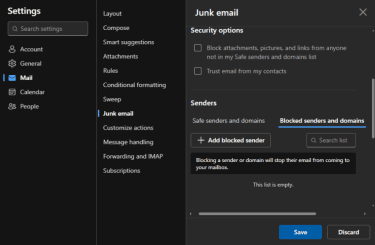
- Select the Settings gear icon in the top-right corner.

- Go to Mail, then Junk email.
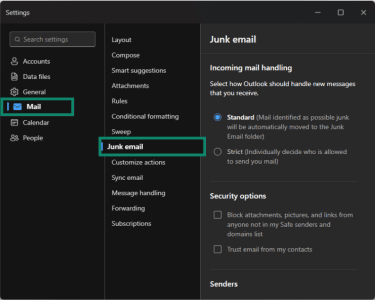
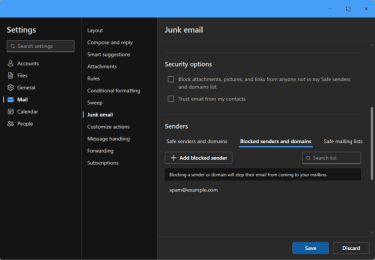
- Under Blocked senders and domains, select Add blocked sender.
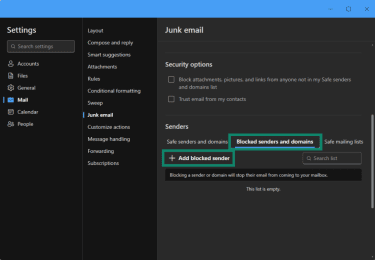
- Type in the email address or domain you want to block and click OK.
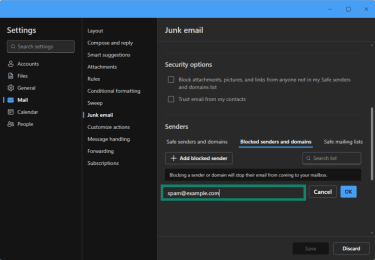
- Click Save.
Note: The Block Sender option isn’t available for third-party email accounts connected to Outlook, such as Gmail, Yahoo, or iCloud. In these cases, you'll need to block senders through your email provider's settings or use Outlook rules to filter unwanted messages.
How to block a sender in classic Outlook for Windows
Classic Outlook covers versions 2016, 2019, 2021, 2024, and the Microsoft 365 desktop app.
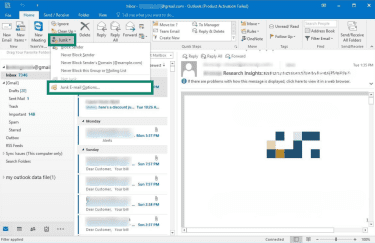
From your inbox:
- Select an email from the sender you want to block.
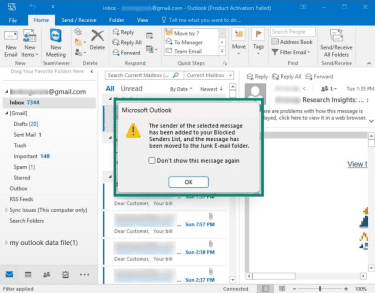
- In the Home tab, click Junk, then select Block Sender.
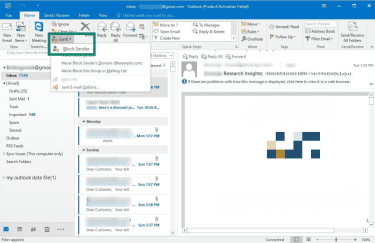
- Click OK in the confirmation that appears.
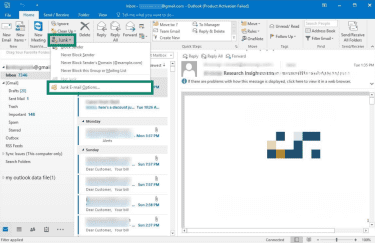
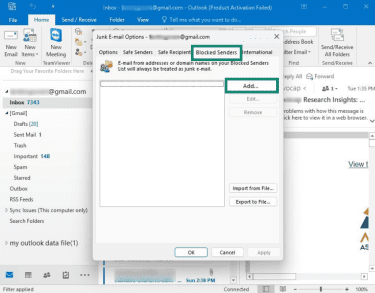
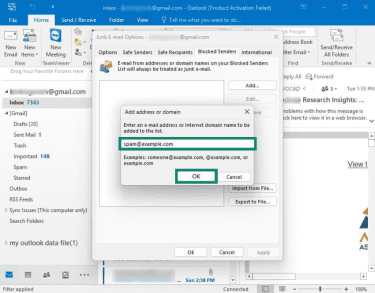
Through settings:
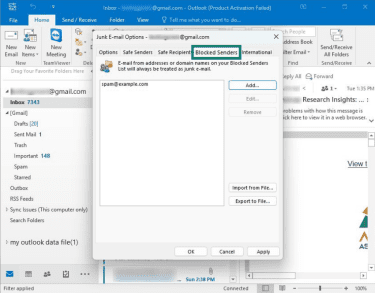
- In the Home tab, click Junk, then Junk E-mail Options.
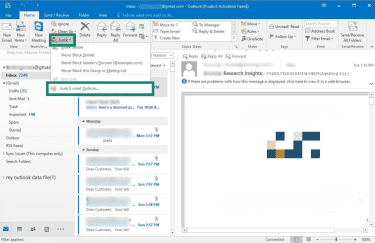
- Open the Blocked Senders tab and click Add.
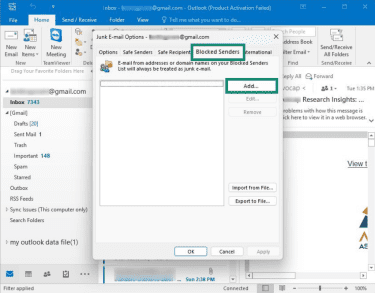
- Enter the email address or domain, then click OK.

How to block a sender in Outlook for Mac
The process is similar in Outlook for Mac:
- Right-click an email from the sender you want to block, then select Block from the dropdown menu.
- Click OK to confirm.
How to block multiple senders
If you’re regularly receiving unwanted emails from several addresses, adding them directly to your blocked senders list is often faster than blocking each one individually.
In new Outlook (Windows and Mac)
Follow these steps to block multiple senders in the new Outlook app for Windows and Mac.
- Click the Settings gear icon.

- Go to Mail, then Junk email.
- Under Blocked senders and domains, click Add blocked sender.

- Enter each address or domain you want to block and click Save.

You can also block an entire domain this way. For example, blocking @example.com will block all emails from that domain, regardless of the specific address they're sent from. This option works best for persistent spam domains. Blocking large public domains might cause legitimate emails from those services to be routed to the Junk Email folder.
In classic Outlook (Windows and Mac)
To add multiple email addresses to the Blocked Senders list in classic Outlook, follow the steps below.
- Go to Home, select Junk, then click Junk E-mail Options.
- Open the Blocked Senders tab and click Add.
- Enter each address, clicking OK after each one.
How to block an email address in Outlook on the web
If you use Outlook through a browser, either with Outlook.com or a Microsoft 365 account, you can block senders directly from your inbox or manage them through your mail settings.
Because blocked sender settings are tied to your Microsoft account, changes made here usually sync across other Outlook apps connected to the same mailbox.
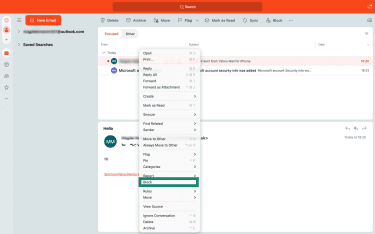
From your inbox:
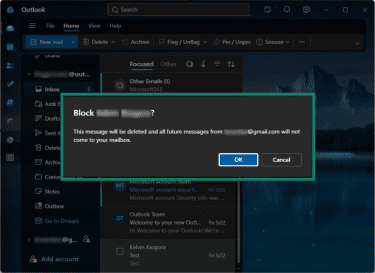
- Open an email from the sender you want to block, and click the three-dot menu in the top-right corner.
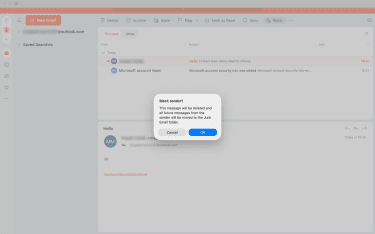
- Select Block, then choose Block [sender name].
- Click OK to confirm.
You can also right-click the email and select Block directly from the dropdown menu.
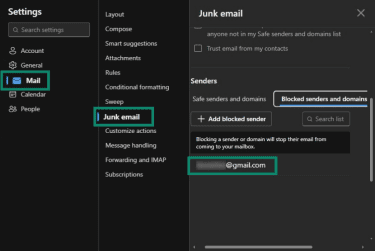
To add or remove addresses from your blocked list through settings:
- Click the Settings gear icon.
- Go to Mail, then Junk email. Under Blocked senders and domains, you'll see all blocked addresses and domains. Add new entries or remove existing ones as needed.
How to block an email address in the Outlook mobile app
The exact layout may vary slightly depending on your device and app version, but the process is generally the same.
- Open the Outlook app and hold to select an email from the sender you want to block. Tap the three-dot menu in the top-right corner.
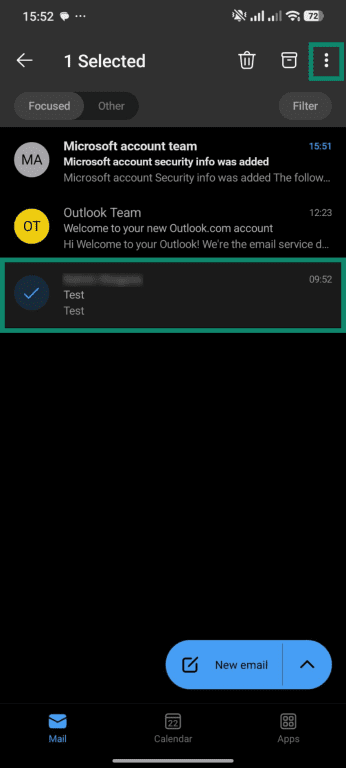
- Select Block Sender.
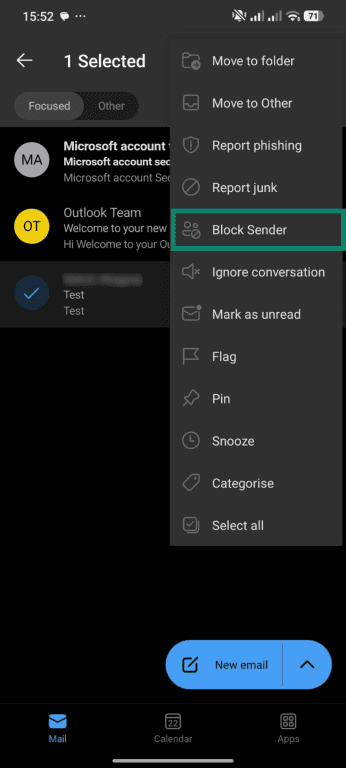
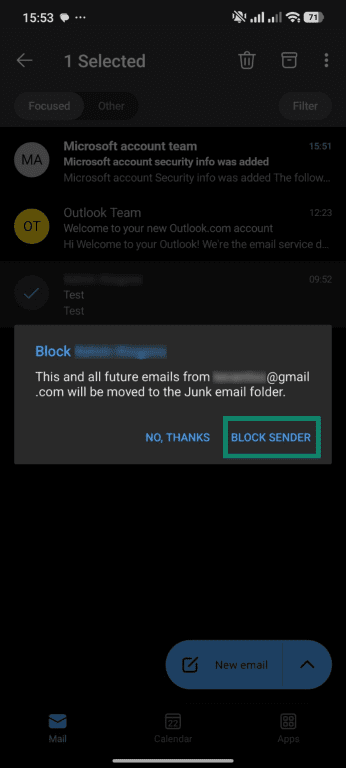
- Tap Block Sender to confirm.
Outlook mobile app limitations
The Outlook mobile app for iPhone and Android supports basic sender blocking but has fewer options than the desktop and web versions. Depending on your account type and app version, you may not be able to:
- Block email addresses in bulk.
- View your complete blocked senders list.
- Adjust detailed junk email settings.
- Create advanced mail rules.
- Manage safe senders lists.
Microsoft regularly updates Outlook mobile, so available features can change over time. For anything beyond a simple one-off block, the desktop app or Outlook on the web gives you much more control.
How to unblock an email address in Outlook
Accidentally blocked someone? Or decided you'd like to receive their emails again? Outlook lets you remove senders from your blocked list at any time.
Unblock a sender in the new Outlook for Windows
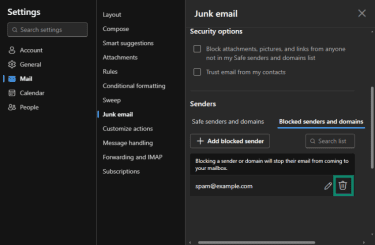
Here’s how to remove a sender or domain from your blocked list in the new Outlook for Windows:
- Select the Settings gear icon.
- Go to Mail, then select Junk email.
- Under Blocked senders and domains, find the address you want to remove.
- Click the trash can icon next to the address.
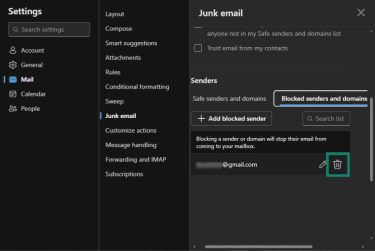
- Save your changes.
Unblock a sender in classic Outlook for Windows
Just follow these steps to unblock a sender in Outlook if you have classic Outlook:
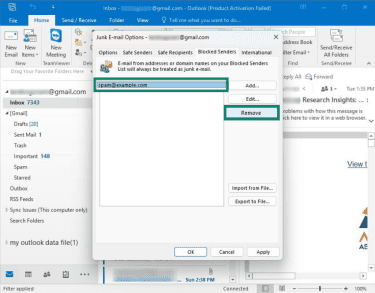
- Under the Home tab, select Junk, then Junk E-mail Options.
- Open the Blocked Senders tab.
- Select the email address you want to unblock and click Remove. Select OK to save.
Unblock a sender in Outlook for Mac
If you’re using a Mac, here’s how to unblock a sender:
- Click on Tools, then select Junk Email Preferences.
- Open the Blocked Senders tab.
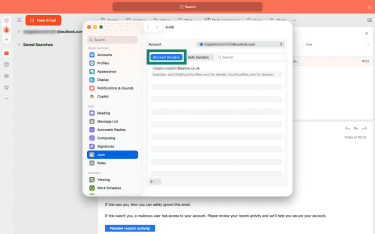
- Select the address you want to unblock and click the – (minus) icon at the bottom to remove it from the list.
Unblock a sender on Outlook on the web
To unblock someone in Outlook.com or Outlook for Microsoft 365:
- Select the Settings gear icon.
- Go to Mail, then select Junk email.

- Under Blocked senders and domains, find the blocked address.
- Click the trash can icon next to the sender.
- Save your settings.
Unblock a sender in the Outlook mobile app
To unblock a sender on the Android or iOS app, navigate to the Junk folder, select an email from the blocked sender, tap on the three dots in the top-right corner, and then tap Unblock sender.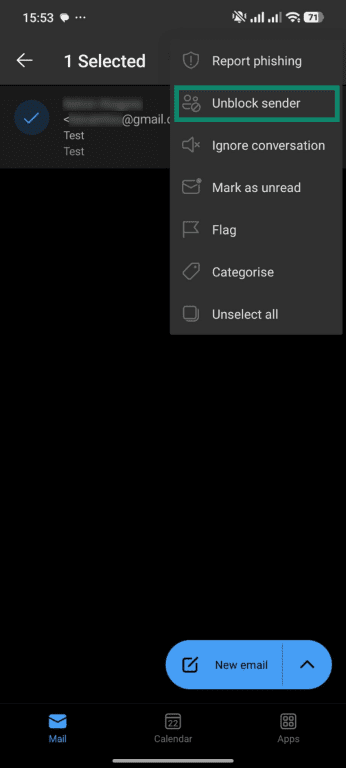
Note: If you’ve already emptied your Junk folder, there won’t be an email to work from, and the mobile app doesn’t currently let you browse or edit your blocked senders list directly. In that case, use the desktop app or Outlook on the web to unblock them.
Why do blocked emails still appear in Outlook?
Blocking a sender doesn’t always stop every unwanted email from them. If messages keep appearing, here’s what’s likely happening.
The sender is using a spoofed email address
Many spam and phishing campaigns use spoofing, where the sender address displayed in your inbox isn’t the address that actually sent the message. So, blocking the displayed address won’t block the email because that’s not where the message came from.
Your best option here is to report the email as phishing rather than just blocking it, so Microsoft can improve its detection.
The sender is using multiple email addresses
Some marketers and spammers rotate through several addresses or domains. For example, blocking offers@example.com won’t automatically block promotions@example.com, support@example.com, or updates@example-mail.com.
If the emails all come from the same organization, blocking the entire domain or creating filtering rules based on keywords or patterns in the subject line may be a more effective solution.
Outlook hasn’t synced your changes yet
Blocked sender settings are typically associated with your Outlook account rather than a specific device. This means changes made on one device should sync automatically to Outlook on the web, desktop applications, and mobile devices connected to the same account.
Occasionally, syncing can take a few minutes. If changes don't appear immediately, try refreshing the app, restarting Outlook, or signing out and back in.
Inbox rules are overriding your filters
Custom rules can sometimes interfere with Outlook’s junk filtering. For example, if you have rules that move emails into a folder or mark certain emails as important, those rules may still process messages before Outlook’s filter kicks in, which may allow blocked messages through.
If blocked emails continue appearing, go to Settings > Rules (or Mail rules in some versions), review your active rules, and disable or edit any that might be interfering.
Other ways to reduce unwanted email in Outlook
Blocking senders is helpful, but it’s only one piece of the puzzle. Outlook includes several other tools that can reduce inbox clutter and improve your email security.
Unsubscribe from mailing lists safely
For email you actually signed up for, such as newsletters, store promotions, or subscription updates, unsubscribing is usually the cleaner option. Most legitimate companies include an unsubscribe link at the bottom of their emails. Click it, follow the confirmation steps, and you’ll stop receiving them.
Some versions of Outlook also show an unsubscribe option directly in the message header. This is the safer way to unsubscribe when it’s available, since Outlook handles the request on your behalf rather than you clicking a link inside the email.
However, don’t use unsubscribe links in suspicious or unexpected emails. Phishing emails sometimes include fake unsubscribe buttons that either confirm your email address is active or redirect you to a malicious website. If something looks off, it’s better to block the sender and delete the email.
Create email rules and filters
Rules allow Outlook to automatically organize incoming emails based on conditions you define, which is far more flexible than blocking alone. For example, you can delete emails that contain certain keywords, move newsletters to a separate folder, sort emails by sender, or flag anything with an attachment from an unknown sender.
To create a rule in new Outlook or Outlook on the web:
- Go to Settings > Mail > Rules.
- Click Add new rule.
- Give the rule a name, then set your conditions, for example, “Subject includes” with a keyword like “unsubscribe” or “limited-time offer.”
- Under Add an action, choose what Outlook should do, for example, Delete or Move to folder.
- Click Save.
To create a rule in classic Outlook:
- Right-click an email in your inbox.
- Select Rules, then Create Rule.
- Set your conditions and actions in the dialog box that appears.
- Click OK.
Here’s a practical example. If you keep getting promotional emails with "SALE" in the subject line from multiple senders, create a rule that automatically deletes any incoming email where the subject contains that word.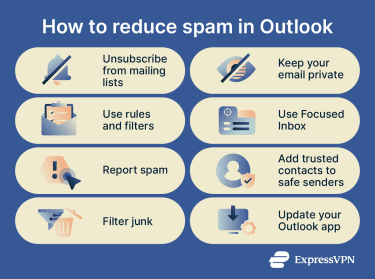
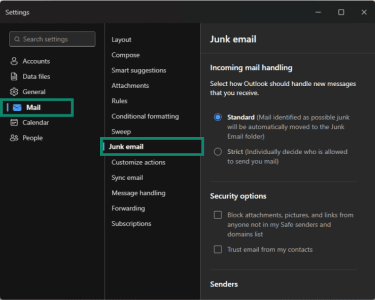
Adjust your junk email filter
Classic Outlook allows you to choose how aggressively it filters unwanted messages.
Go to Home > Junk > Junk Email Options, then choose a protection level under the Options tab:
- No automatic filtering: Turns off the filter entirely. This is generally not recommended.
- Low: Filters only the most obvious spam.
- High: Catches more spam but may occasionally move legitimate emails to Junk.
- Safe lists only: Only emails from addresses on your safe senders list reach your inbox. It’s very restrictive, but useful if you’re getting overwhelming spam.
In new Outlook and Outlook on the web, these levels aren't available as distinct settings. Instead, you manage safe senders, blocked senders, and blocked domains through
Settings > Mail > Junk email.
Be careful about where you share your email address
The most effective way to reduce spam is to limit who has your email address. Every time you sign up for a service, enter a competition, or fill out an online form, you're potentially adding your address to a list that could be sold or misused.
One way to keep your email private is to use a secondary email address for online shopping, app sign-ups, and anything you don't expect to maintain long-term. Keep your primary address for work and personal contacts.
Another option is to take advantage of anonymous email forwarding. Outlook lets you create alias email addresses linked to your main account. An alias looks like a separate email address but delivers mail to the same inbox. If one alias starts attracting spam, you can delete it without affecting your main address or any of your other aliases.
One thing to keep in mind is that Microsoft only lets you have a maximum of 10 active aliases in total, and you can only add up to two new aliases within any seven-day period.
If you need more aliases, consider using a dedicated service that supports unlimited addresses and works with multiple email providers, including Gmail, Yahoo Mail, and Outlook.
Additionally, avoid posting your email address publicly on forums, social media profiles, or public websites, since this makes it easy for automated bots to scrape and add it to spam lists.
Use Outlook's Focused Inbox
Focused Inbox separates your emails into two tabs: Focused (emails Outlook considers important) and Other (everything else, including newsletters and automated messages). It's not a spam filter, but it helps keep your main view cleaner.
To turn it on:
- Desktop and web: Go to Settings > Mail > Layout, then select Sort messages into Focused and Other.
- Mobile: Tap the Profile icon, go to Settings, Mail, and toggle Focused Inbox on.
Keep your Outlook app updated
Microsoft regularly releases updates to Outlook that improve spam detection and security. Running an outdated version of the app could leave your inbox more vulnerable to spam and phishing attempts.
FAQ: Common questions about blocking email addresses in Outlook
Does the sender know I blocked them in Outlook?
Is blocking the same as reporting spam?
Can a blocked sender still email me from another address?
Can I block an entire domain in Outlook?
Take the first step to protect yourself online. Try ExpressVPN risk-free.
Get ExpressVPN